.svg)


Tiling Practices from the Pros: The Key to Making Any Tiled Surface Dazzle
ByKanchan Agarwal
Sun , Jul 05 , 2026
Read Time: 5 Min

Tiles can make or break the look of any interior space. They add structure, reflect design sensibility, and define how clean and refined a room appears. Yet, even premium-quality tiles can lose their impact if installed carelessly. Professional tilers follow a systematic process that ensures every tile sits perfectly and stays that way for years. Their approach blends technical precision with practical know-how, right from planning the layout and choosing adhesives to maintaining grout consistency and ensuring proper curing.
These steps might seem simple, but they determine how even, glossy, and durable your finished surface looks. In this blog, you’ll explore the expert practices that help create smooth, polished tile finishes, the same techniques professionals rely on to make walls, floors, and backsplashes stand out beautifully.
Planning the Layout Before the First Tile Is Set
Every professional begins with a detailed layout plan. Before any adhesive touches the floor or wall, they visualise how the tiles will align with the space. They mark reference lines to maintain symmetry and prevent awkwardly cut edges near walls or corners.
For patterned tiles, pros often dry-lay a few rows to preview the alignment. This step avoids last-minute adjustments and ensures the pattern flows naturally across the surface. A precise layout also helps calculate how many tiles, spacers, and trims are required, saving time, effort, and unnecessary costs later.
Choosing the Right Adhesive for the Tile and Surface
One of the most overlooked yet critical parts of tiling is selecting the correct adhesive. Professionals never use a one-size-fits-all approach. The adhesive must match the tile’s material and the type of surface it’s being laid on. For example:
- Cement-based adhesive works best for ceramic and porcelain floor tiles.
- Epoxy-based adhesive is ideal for moisture-heavy areas like bathrooms and swimming pools.
- Flexible adhesive is used on surfaces prone to slight movement or temperature changes.
The right adhesive guarantees durability and prevents tiles from cracking, lifting, or detaching over time.
Surface Preparation Is Non-Negotiable
No matter how good the tile or adhesive, if the surface isn’t prepared well, the result will fail. Professionals always start with a clean, level, and dry surface. Dust, oil, or uneven patches can ruin adhesion. They inspect the area closely, repair cracks, and use primers or leveling compounds where needed.
On walls, old paint or wallpaper is completely removed. For floors, the base must be sturdy and moisture-free. Proper surface preparation ensures the tiles bond firmly and last for years without shifting or hollow spots.
Measuring and Cutting Tiles with Precision
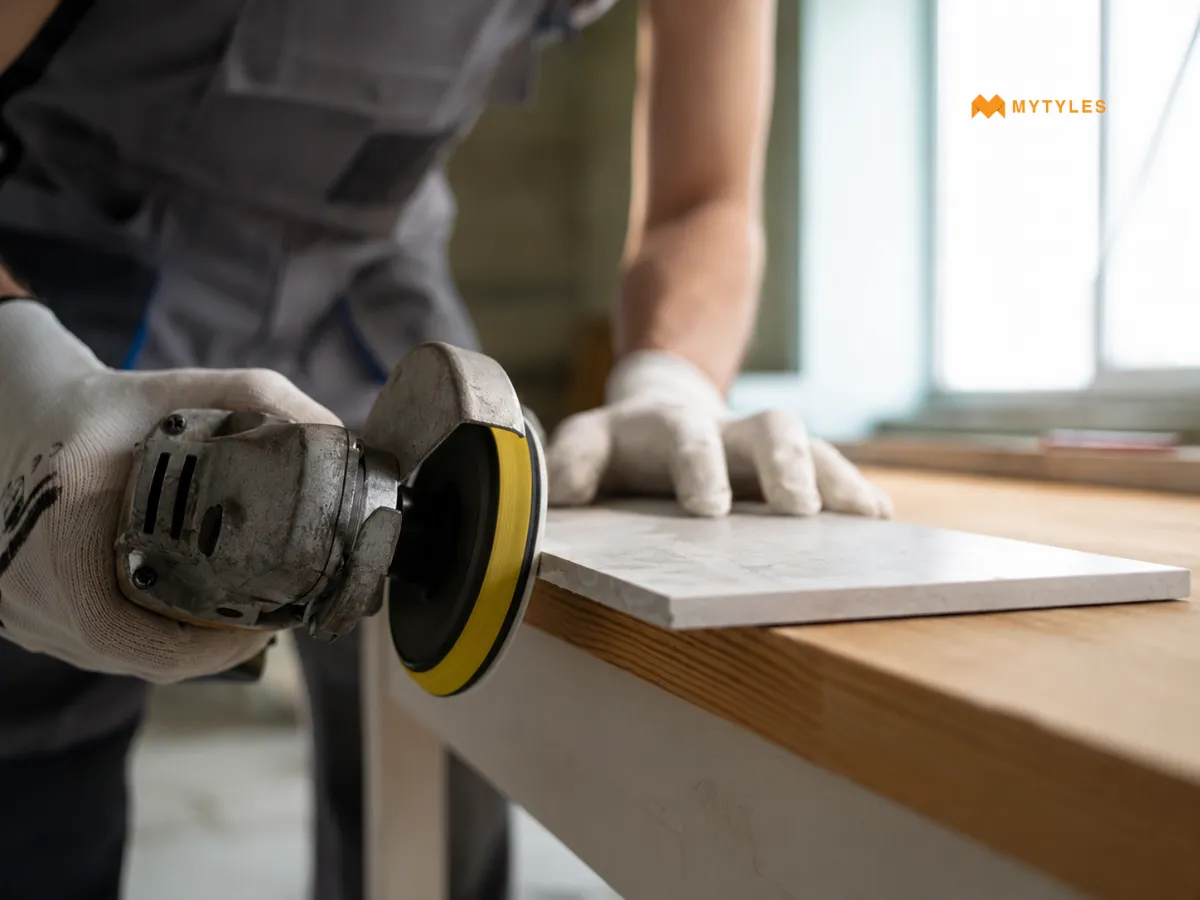
Perfect alignment depends on accurate cutting. Pros never rush this step. Using tools like tile cutters, wet saws, or angle grinders, they achieve smooth edges and exact fits around fixtures or corners.
Each cut is measured twice and marked before trimming to maintain a uniform look.
Professionals also account for grout spacing during cutting, ensuring the final layout appears even across the entire surface. The result: no unsightly gaps, no mismatched edges, only a polished, consistent look.
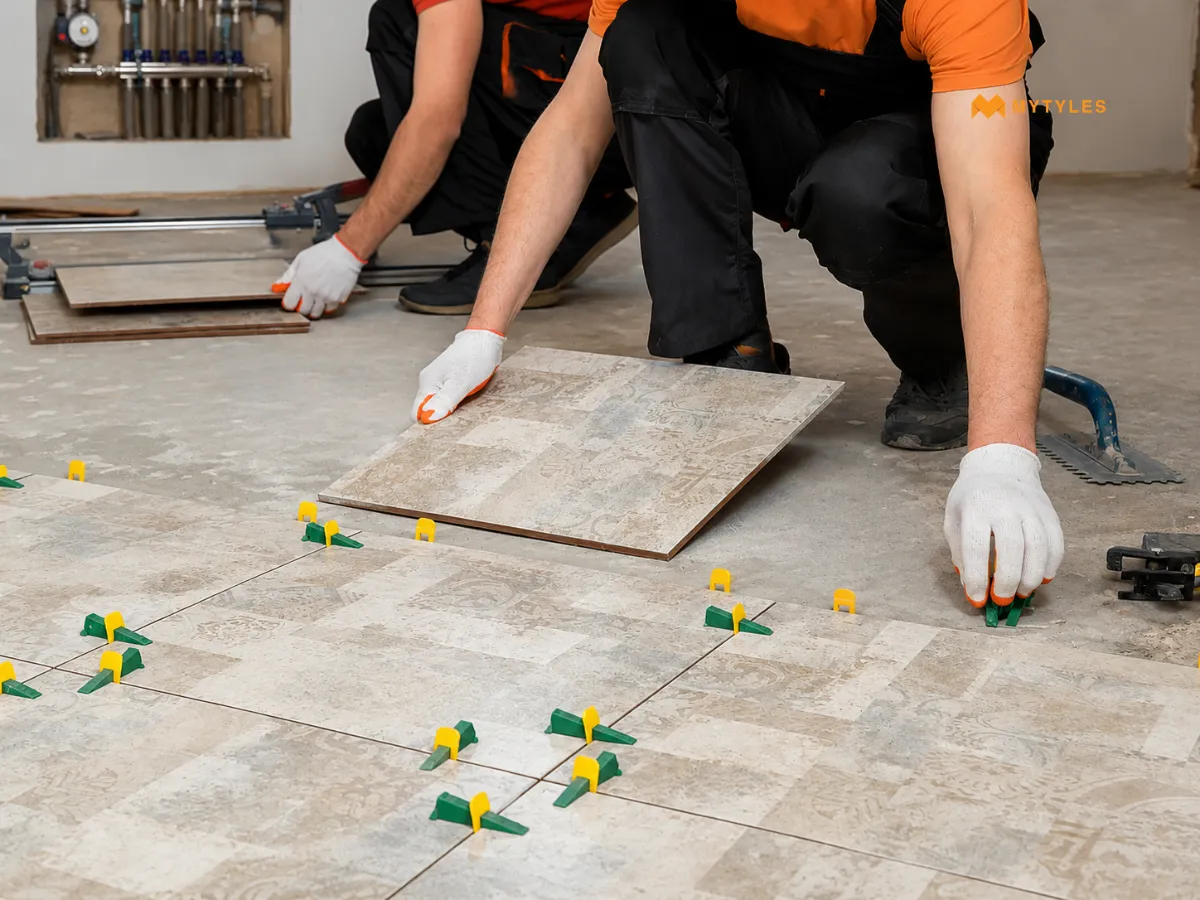
Maintaining Consistent Grout Lines
Uneven grout lines instantly break the visual appeal of any tiled area. That’s why professionals use tile spacers throughout installation to maintain uniform spacing. The width of the grout line depends on the type of tile and its finish, smaller joints for sleek modern tiles, wider ones for rustic or handmade looks.
Once the tiles are set, pros clean out excess adhesive from between the joints before applying grout. They ensure the color and texture of grout complement the tiles, not distract from them. A consistent grout line can elevate even the simplest tiles into a high-end finish.
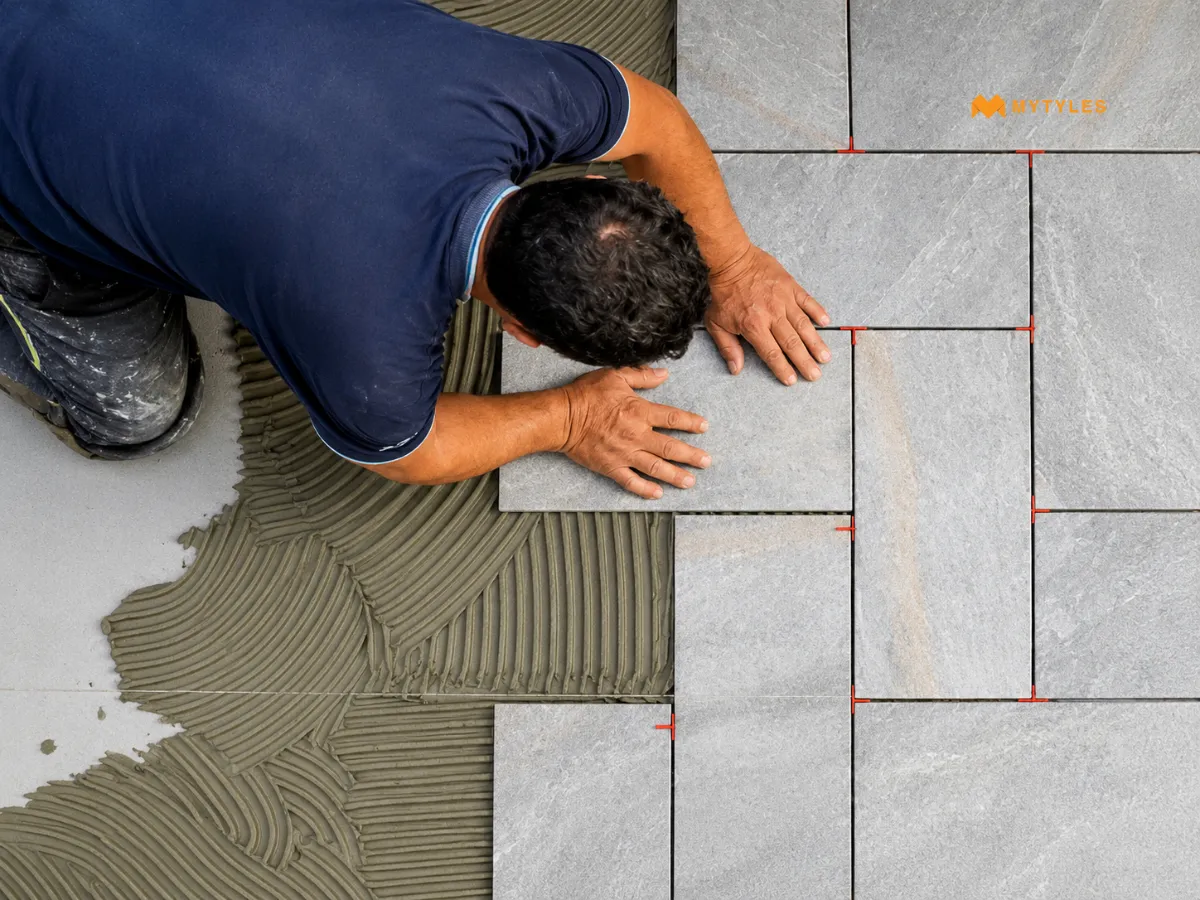
Using the Right Tiling Tools and Techniques
Professional results depend heavily on professional tools. Experts rely on precision instruments like:
- Notched trowels for even adhesive spread
- Tile spacers for perfect alignment
- Spirit levels for accuracy
- Tile cutters for clean edges
They also follow the correct troweling method, spreading adhesive evenly and combing it in one direction to avoid air pockets. On large-format tiles, back-buttering is used to improve adhesion and prevent voids underneath. These techniques create a strong bond and flawless surface without dips or uneven spots.
Paying Attention to Tile Orientation and Pattern
The visual direction of tiles can change how a room feels. Pros use orientation strategically:
- Diagonal layouts make small rooms appear larger.
- Horizontal placement widens narrow walls.
- Vertical alignment adds height to compact spaces.
They also carefully match veining patterns in natural stone tiles for a continuous, flowing appearance. This eye for detail ensures a visually balanced design that complements the space’s architecture.
Allowing Proper Drying and Curing Time
Rushing through drying time is one of the biggest tiling mistakes. Experts follow manufacturer guidelines for adhesive and grout curing. Walking over freshly installed tiles too soon can cause movement, uneven levels, or even cracks.
Most adhesives need at least 24 hours to set properly, while grout requires another 24 to cure completely. Pros use protective sheets to prevent dust or accidental movement during this phase. Patience here pays off with lasting strength and stability.
Cleaning and Sealing the Final Surface
Once the tiles are set and grouted, cleaning becomes crucial. Professionals remove haze, adhesive residue, and grout film using a damp sponge and pH-neutral cleaner. For porous materials like stone, travertine, or unglazed tiles, sealing is mandatory. Sealants protect against stains, moisture, and discoloration, especially in kitchens and bathrooms. A well-sealed surface retains its shine, color, and smoothness over years of daily use.
Regular Maintenance Tips Pros Recommend
Even the most perfectly installed tiles need ongoing care to maintain their brilliance. Regular cleaning, sealing, and inspection ensure long-lasting durability, preventing stains, cracks, and dullness over time. Experts suggest:
- Sweep or vacuum tiles daily to remove dust and grit that may scratch or dull the surface over time.
- Clean tiles using mild, pH-neutral detergent to maintain their shine and protect the grout from chemical damage or fading.
- Avoid acidic or abrasive cleaners, as they weaken tile surfaces, damage finishes, and erode grout between the joints.
- Reseal natural stone tiles every 12–18 months to protect against moisture absorption, staining, and discoloration in high-use areas.
- Inspect grout lines regularly for small cracks or gaps and repair them early to prevent water seepage or mold growth.
- Wipe spills instantly using a soft cloth to avoid permanent stains, especially on light-colored or porous tile materials.
- Use gentle mops or microfiber cloths for cleaning instead of rough brushes that may scratch glazed or polished surfaces.
- Place mats at entryways to reduce dirt tracking and protect floor tiles from wear caused by heavy foot traffic.
These habits maintain the original luster and prevent premature wear or dullness.
Elevate Every Surface with Expert Tiling Practices
Precision, planning, and patience are the foundation of a flawless tiled surface. Professional techniques, right from surface preparation to sealing, make sure every tile aligns perfectly, adheres securely, and looks stunning for years. For homeowners and designers aiming to achieve that polished, professional finish, expert tiling practices make all the difference. At MyTyles, you’ll find an extensive range of premium wall and floor tiles curated for every space, from contemporary minimalism to artistic heritage. Explore our collection today and give your next project the professional edge it deserves.

Why Are Professional Tiling Practices Important?

Professional tiling practices are important because they improve the final look, strength, and life of any tiled surface. Proper surface preparation, tile alignment, adhesive selection, spacing, and grouting help prevent cracks, uneven levels, and loose tiles. When done correctly, tiling looks cleaner, feels more premium, and performs better in daily use.
How Do Pros Prepare A Surface Before Tiling?
Pros always start by checking whether the surface is clean, level, dry, and free from dust, oil, or loose material. Any cracks or uneven spots are repaired before installation begins. This step is essential because even the best tiles can fail if the base is weak. A properly prepared surface ensures better bonding and finishing.
Why Is Tile Layout Planning Important Before Installation?
Tile layout planning helps avoid awkward cuts, uneven borders, and poor pattern placement. Professionals dry-lay tiles first to understand how the design will look before fixing them permanently. This is especially important for patterned, marble-look, wooden, or large-format tiles. A planned layout creates balance, symmetry, and a polished finish across the entire surface.
What Adhesive Should Be Used For Tiling?
The right adhesive depends on the tile type, size, surface, and location. Large-format tiles, exterior walls, wet areas, and heavy tiles usually need stronger, high-quality adhesives. Professionals avoid using one common mix for every job because poor bonding can cause tiles to loosen. Choosing the correct adhesive improves durability and long-term performance.
How Important Is Grout Spacing In Tiling?
Grout spacing is very important because it allows tiles to settle properly and helps manage slight size variations. Consistent gaps create a neat, professional appearance and reduce the risk of cracking or edge damage. Pros use spacers to maintain equal joints throughout the surface. Good grout work also improves hygiene, moisture resistance, and visual appeal.
How Can A Tiled Surface Look More Premium?
A tiled surface looks more premium when tiles are aligned perfectly, cuts are clean, joints are even, and grout color matches the design. Proper lighting, edge finishing, and pattern continuity also make a big difference. Professionals focus on small details because these finishing touches turn a basic tile installation into a polished design feature.
How Do I Maintain A Professionally Tiled Surface?
Maintain a tiled surface by cleaning it regularly with mild cleaners, avoiding harsh acids, and wiping spills quickly. Use soft brushes or cloths depending on the tile finish. Check grout lines occasionally for cracks, stains, or gaps. Proper maintenance protects the finish, prevents moisture issues, and keeps the tiled surface looking fresh and dazzling for years.

ABOUT THE AUTHOR
Kanchan Agarwal
Kanchan Agarwal is the Director at MyTyles, where she brings together her love for design, colours, and beautiful homes. Having helped build MyTyles from the ground up, she has developed a deep understanding of what homeowners look for when creating spaces that feel personal, practical, and inspiring. With an engineering background and a natural interest in interiors, Kanchan enjoys turning simple ideas into thoughtful tile choices that suit real homes and real lifestyles. Her approach is warm, creative, and people-focused, helping customers feel more confident while choosing designs that reflect their taste and make their spaces truly their own.
Latest Blogs By MyTyles